

Experts are constantly discussing how to make the web better. Accessibility, UI/UX, web performance, you name it. You might not hear about internationalization (i18n) as much as other topics, but it is still essential to making the web better. In this article, we'll gain an understanding of the impact of i18n, explore the fundamental logic, and learn how to implement i18n in a Remix app.
I also talked about i18n with Remix in my Remix Conf 2023 talk. If you want to watch the video recording, you can find my i18n talk here.
What is i18n?
i18n stands for internationalization: there are 18 characters between the first character, “i” and the last character, “n”. In short, i18n is about implementing the structures and features in your applications to deliver a localized version of your content for every one of your user.
There are many reasons why we should care about i18n. The most important reason is that it makes your application more accessible to people who speak different languages. There are interesting numbers and statistics that prove this. For example, 5.07 billion people used the internet in 2020. That's more than half of the world's population. Of the over 5 billion users, 74.1% accessed the content in another language than English.
You can find and explore the statistics for the above claim on Statista.
i18n fundamentals
Before we dive into how i18n works with Remix, let's take a look at the fundamentals of i18n. There are three ways to determine languages and regions in i18n: location of the IP address, Accept-Language header or Navigator.languages, and identifiers in URLs.
Location of the IP address
This approach uses the location of the request's IP address to serve the most popular language of that region. This approach has a couple of problems, the first being that there are more accurate ways to determine languages and regions. Additionally, this approach does not provide the best UX for users. For example, if you're traveling to another country, you will see the content in the language of that country instead of your preferred language.
Accept-Language header or Navigator.languages
This approach is based on the language settings of your browser. It's more accurate than using the location of the IP address. This approach provides the user's preferred language information, but users cannot switch languages from the UI.
Identifiers in URLs
This approach is based on identifiers set in the URL. It's the most accurate way to determine languages and regions. It requires more work to implement but provides the best UX for users. Examples of identifiers in URLs are https://remix.run/de-at, https://remix.run/fr-ca, etc. This approach is called localized sub-directories.
Alternatively, you can use different domains and URL parameters for other languages and regions to create URL identifiers if you don't care about SEO and same-origin policy. But generally we care about those things as we make the web better, so we'll focus on localized sub-directories in this article.
How i18n works with Remix
When you are going to implement i18n with any framework, you should consider whether or not they provide MULTIPLE PRACTICAL & FLEXIBLE options.
I insist on this a lot in my i18n talk because otherwise your DX will be painful and you will likely end up sacrificing UX due to the technical limitations of the framework. I'm not saying that other frameworks are inadequate, but I have experienced nightmares with other frameworks when I was working on i18n projects, such as not being able to modify slugs programmatically, requiring extra npm packages, etc.
i18n is a complex topic, and there's more than one straightforward way to implement it. That's why we need several practical and flexible options to find the best way to implement i18n for each project.
Fortunately, Remix provides several practical and flexible options for implementing i18n! Let's take a look at how i18n works with Remix.
1. remix-18next
remix-i18next is a npm module created by Sergio Xalambrí for i18n with Remix. remix-i18next is built on top of i18n JavaScript library, i18next. i18next provides features to localize your product on web, mobile, and desktop, and comes with many standard i18n features.
This approach takes a few steps to implement i18n with Remix, such as installing several npm modules, maintaining translation JSON files at the source code level, and using the useTranslation hook to translate the content.
There are a few configuration files, such as JSON files with localized values and an i18n config file for server-side and client-side configurations.
// common.json
{
  "intro": "こんにちは!"
}
// i18n.js -> i18n config file
export default {
  supportedLngs: ["en", "ja"],
  fallbackLng: "en",
  defaultNS: "common", // common.json namespace
  react: { useSuspense: false }, // Disabling suspense is recommended
};
// i18next.server.js -> contains the logic to be used in entry.server.jsx
import Backend from "i18next-fs-backend";
import { resolve } from "node:path";
import { RemixI18Next } from "remix-i18next";
import i18n from "~/i18n"; // i18n config file

let i18next = new RemixI18Next({
  detection: {
    supportedLanguages: i18n.supportedLngs,
    fallbackLanguage: i18n.fallbackLng,
  },
  i18next: {
    ...i18n,
    backend: {
      loadPath: resolve("./public/locales/{{lng}}/{{ns}}.json"),
    },
  },
  backend: Backend,
});

export default i18next;
There are server-side and client-side config files with i18n initialization for detecting specific locales from each request and loading the appropriate translation JSON files. For more details on those files, you can check out my separate article about remix-i18next.
After setting up the configuration files, you can use the useTranslation hook to translate the content.
// root.jsx
import { json } from "@remix-run/node";
import { useChangeLanguage } from "remix-i18next";
import { useTranslation } from "react-i18next";
import i18next from "~/i18next.server";
//...

export let loader = async ({ request }) => {
  let locale = await i18next.getLocale(request);
  return json({ locale });
};

export let handle = {
  i18n: "common",
};

export default function App() {
  // Get the locale from the loader
  let { locale } = useLoaderData();
  let { i18n } = useTranslation();

  // change the language of the instance to the locale detected by the loader
  useChangeLanguage(locale);

  return (
    <html lang={locale} dir={i18n.dir()}>
      ...
    </html>
  );
}
// any route
import { useTranslation } from "react-i18next";

export default function MyPage() {
  let { t } = useTranslation();
  return <h1>{t("intro")}</h1>;
}
I've written a separate article about remix-i18next if you're interested in learning more about how exactly you can use remix-i18next with code snippets.
Note, the remix-i18next approach requires installing several additional npm modules and maintaining translation JSON files at the source code level. It'll require some effort to implement localized sub-directories. Consider the next approach if you want content editors to take more responsibility to help you with content tasks.
2. A combination of Remix & CMS
As I mentioned the importance of having SEVERAL PRACTICAL & FLEXIBLE options, investigating which CMS to use will be a vital process to have more options to find the best approach for your website. CMSs offer various methods to help structure localized content and manage that content separately from the source code.
Depending on each CMS, the number of options and the way to implement i18n will be different. In this article, I'll use Storyblok as one of the examples.
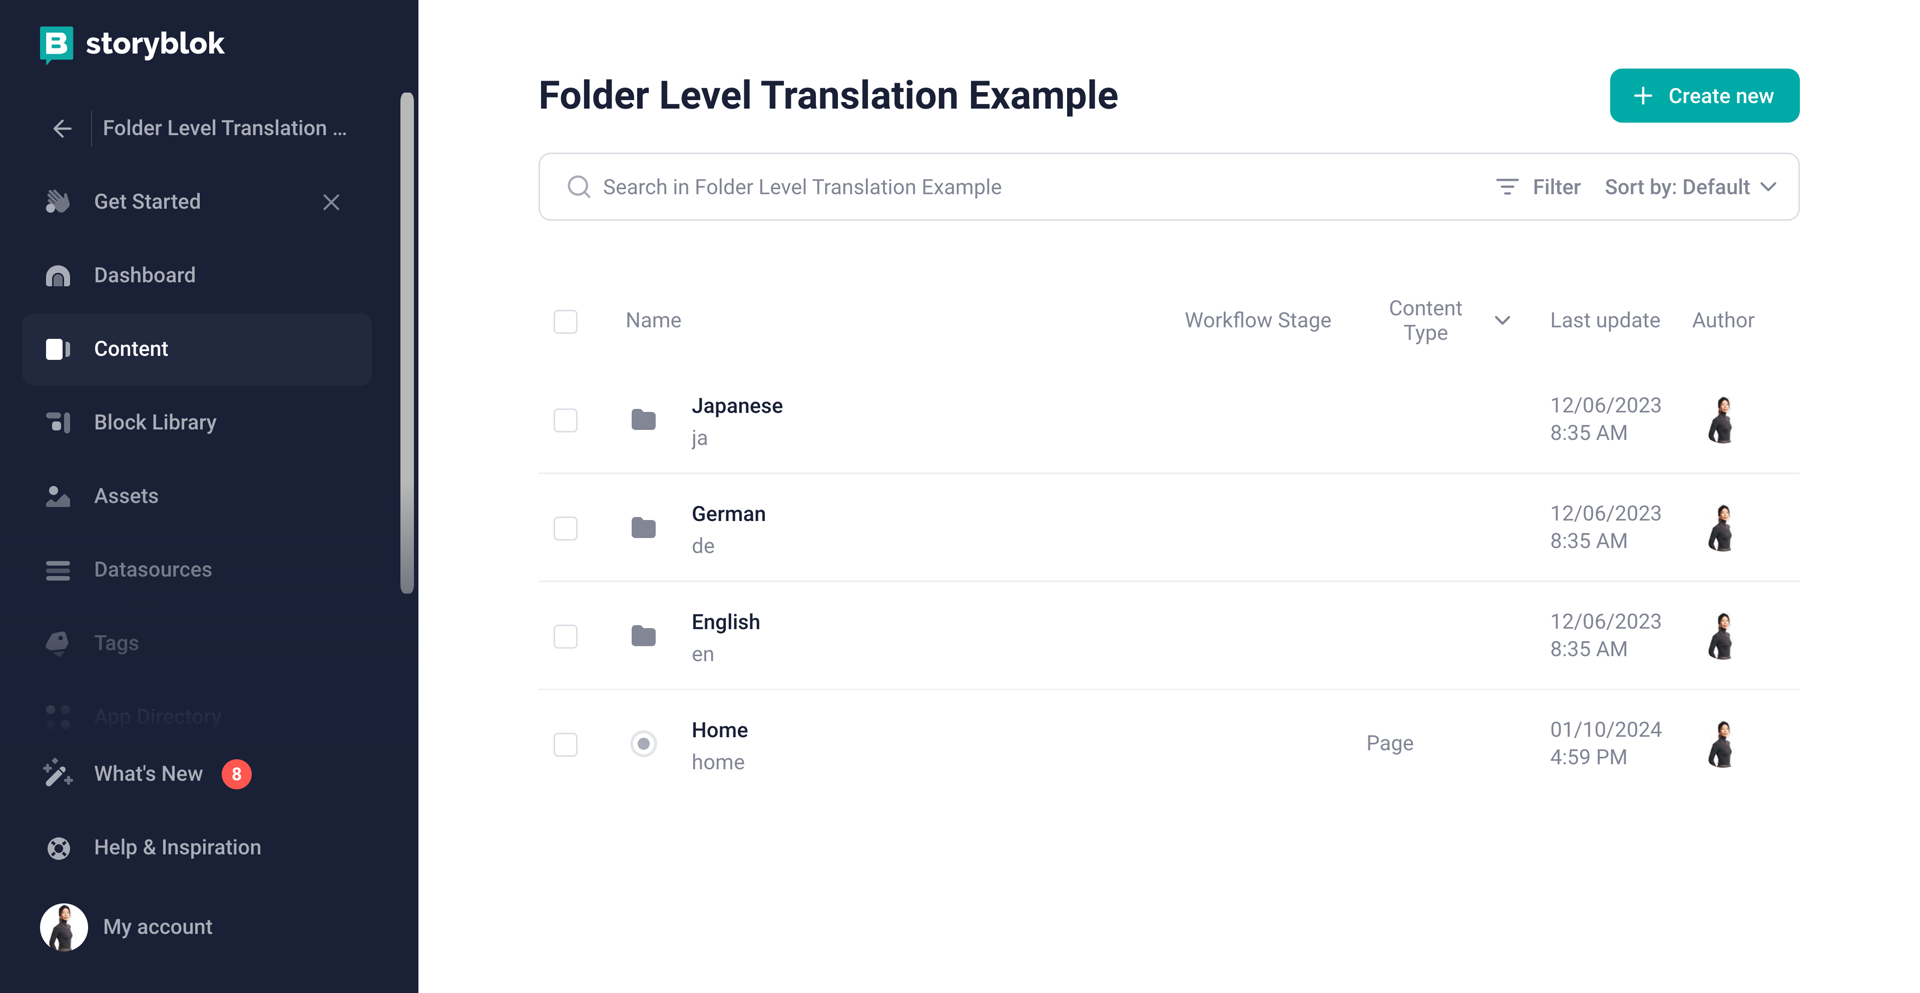
Storyblok has four approaches you can choose to structure the content to leave enough room to make i18n implementations flexible and efficient.
- Folder-level translation
- Field-level translation
- Mix of folder-level and field-level translation
- Space-level translation
Folder-level translation approach allows you to create a folder for each language and region and manage content in each folder. In a way, you can create different environments for content editors. At the same time, folder names work as localized sub-directories. Content editors can help you visualize how they want to structure localized sub-directories from the CMS UI in each language and region.
It makes it easier for us to implement localized sub-directories as we can focus on implementation. You can enjoy great DX while implementing i18n with Remix and a folder-level translation approach using Remix's Splat Routes to catch all slugs in any nested levels.
I've also written a separate article about a combination of Remix & CMS with a folder-level translation approach including how to use Splat Routes.
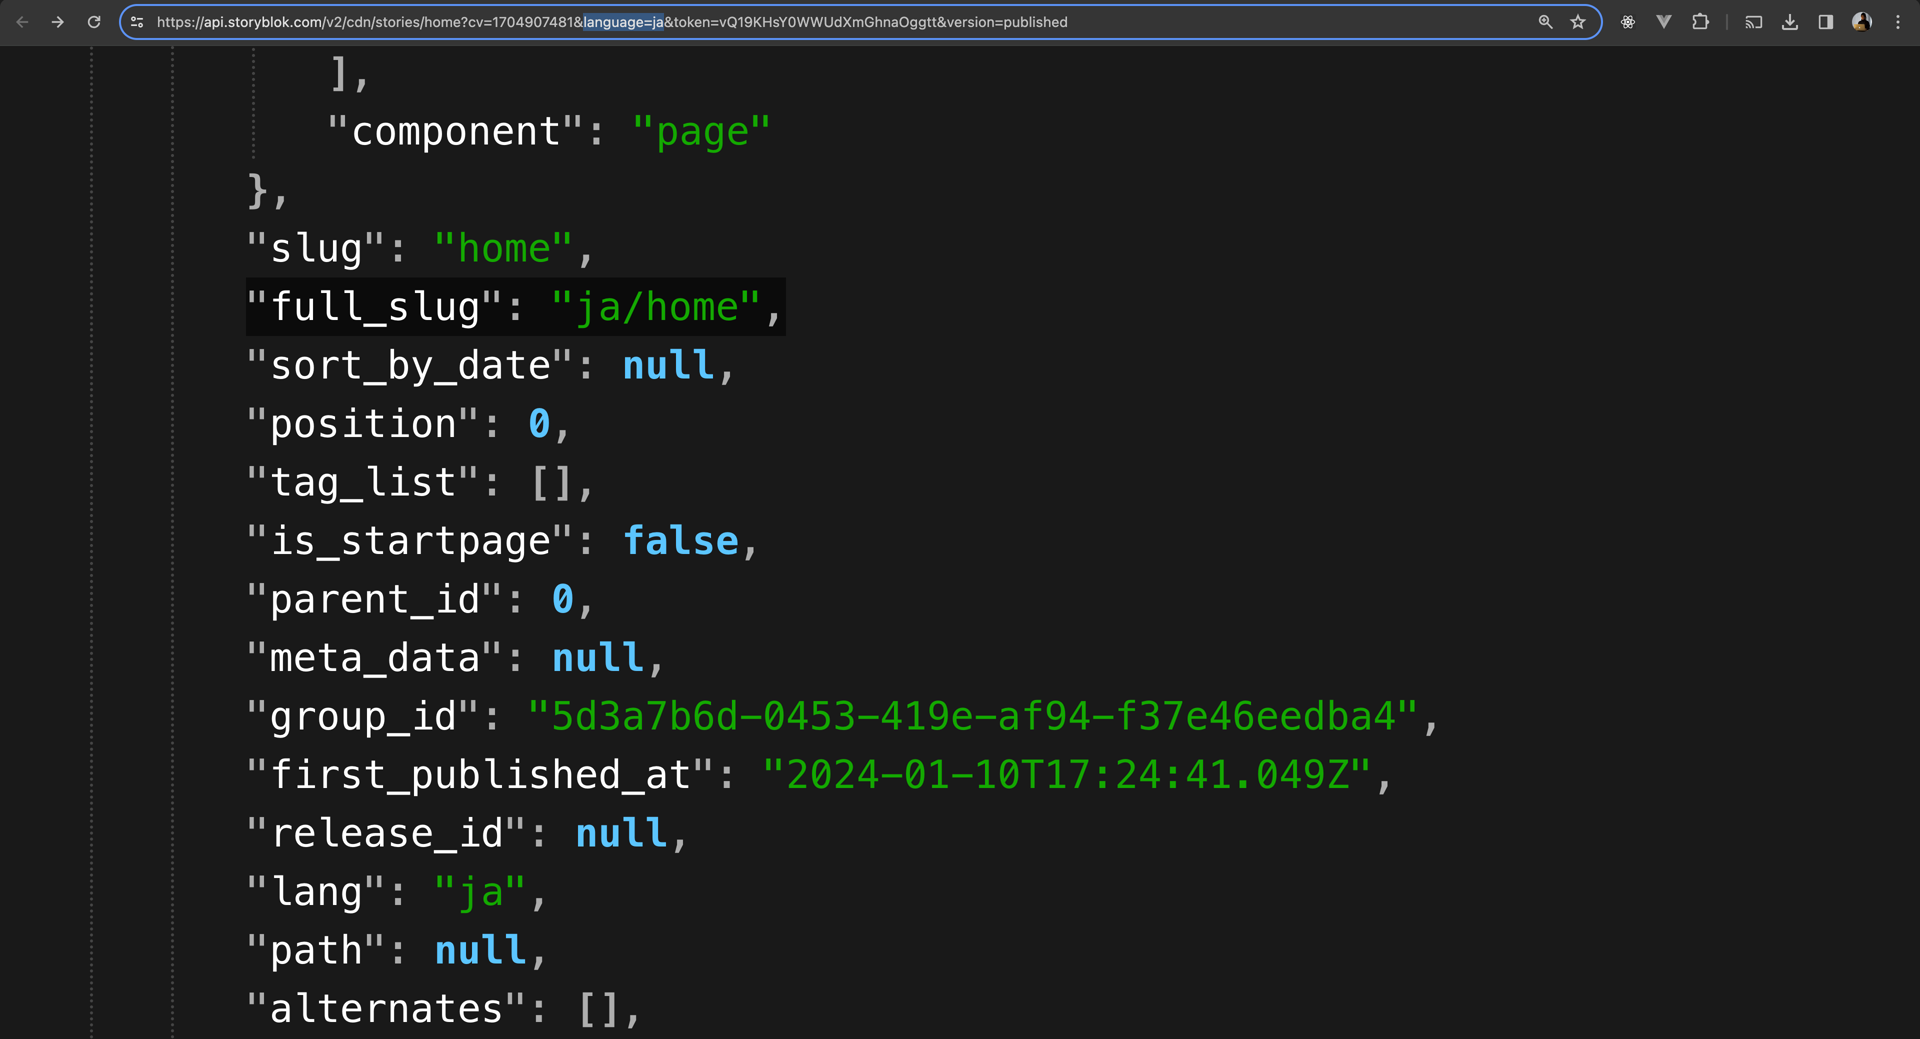
Field-level translation approach creates one content tree. There's no need to create stand-alone folders for each language and region. Translatable fields will be stored in the content tree as a separate stand-alone property with suffixes for each language. In short, if you want to apply the same page layout for each language and region, you can use this approach to prevent duplicating common pages in several localized content folders. Instead, create one page and localize the content in one content tree.
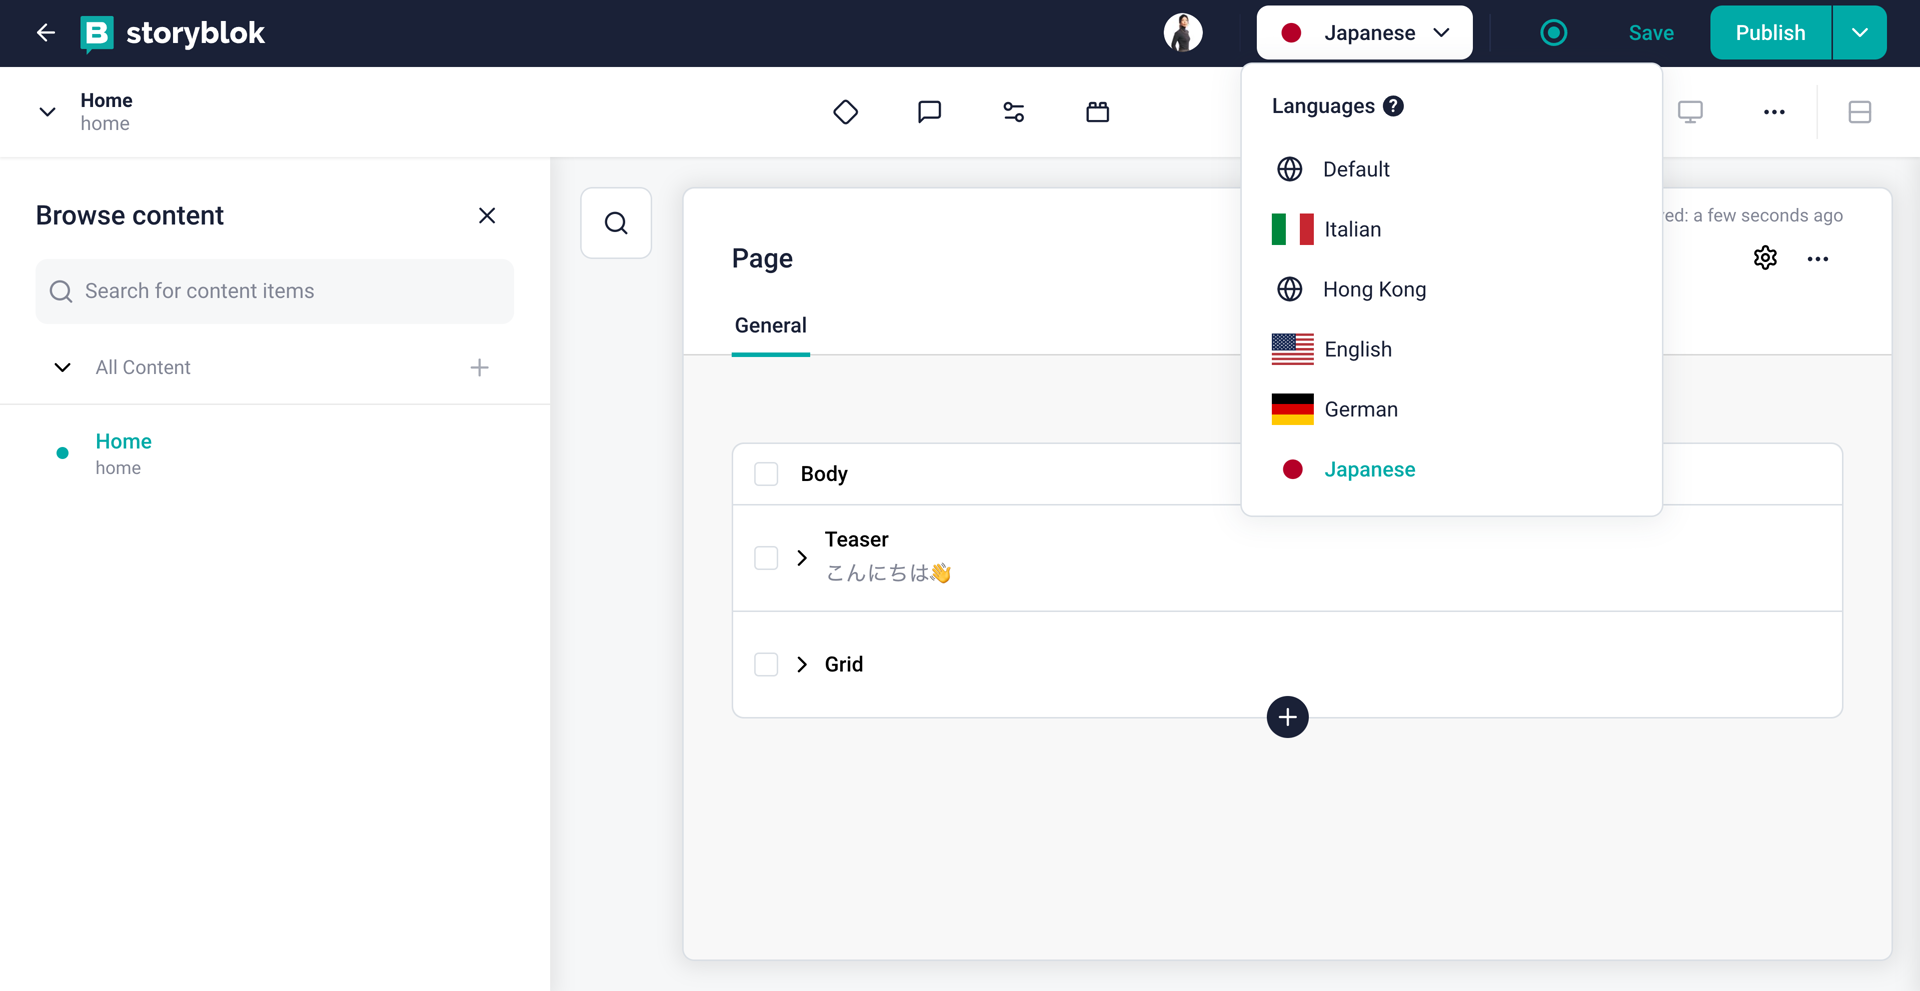
To visualize how exactly one content tree stores translatable fields as a separate stand-alone property with suffixes of all languages, you can check out the screenshot of the JSON file for this home page.
As you change the language parameter on the URL (i.e., language=ja to language=de or any other language options from the screenshot above on the Storyblok UI), you can see the JSON for each language and region with corresponding full_slugs and lang.
Storyblok also offers Links API to retrieve links objects containing all links.
To enable corresponding live preview on the Storyblok UI, you can install Advanced Paths app to configure the preview URLs programmatically for each language and region.
Mixing folder-level and field-level translation approaches is also possible. This approach is more complex and handles many regions such as de-at, de-ch, de-de, etc.
Space-level translation approach is for creating a separate space for each language and region. This approach simplifies the division of environments for content editors and developers. It's good to keep in mind as a way to simplify the environments.
For example, while you secure the divided environments in each space, you can use Storyblok CLI and Management API to share components, pages (a story at Storyblok), and schemas between spaces. It's a good way to keep the content structure and components consistent.
I listed four approaches from one of the CMSs but there are cases in which you won't go with the CMS approach regardless of your great POC to convince your team and decision-makers. Sometimes, things like budget decisions are out of our hands, right? In that case, you can consider the following approach.
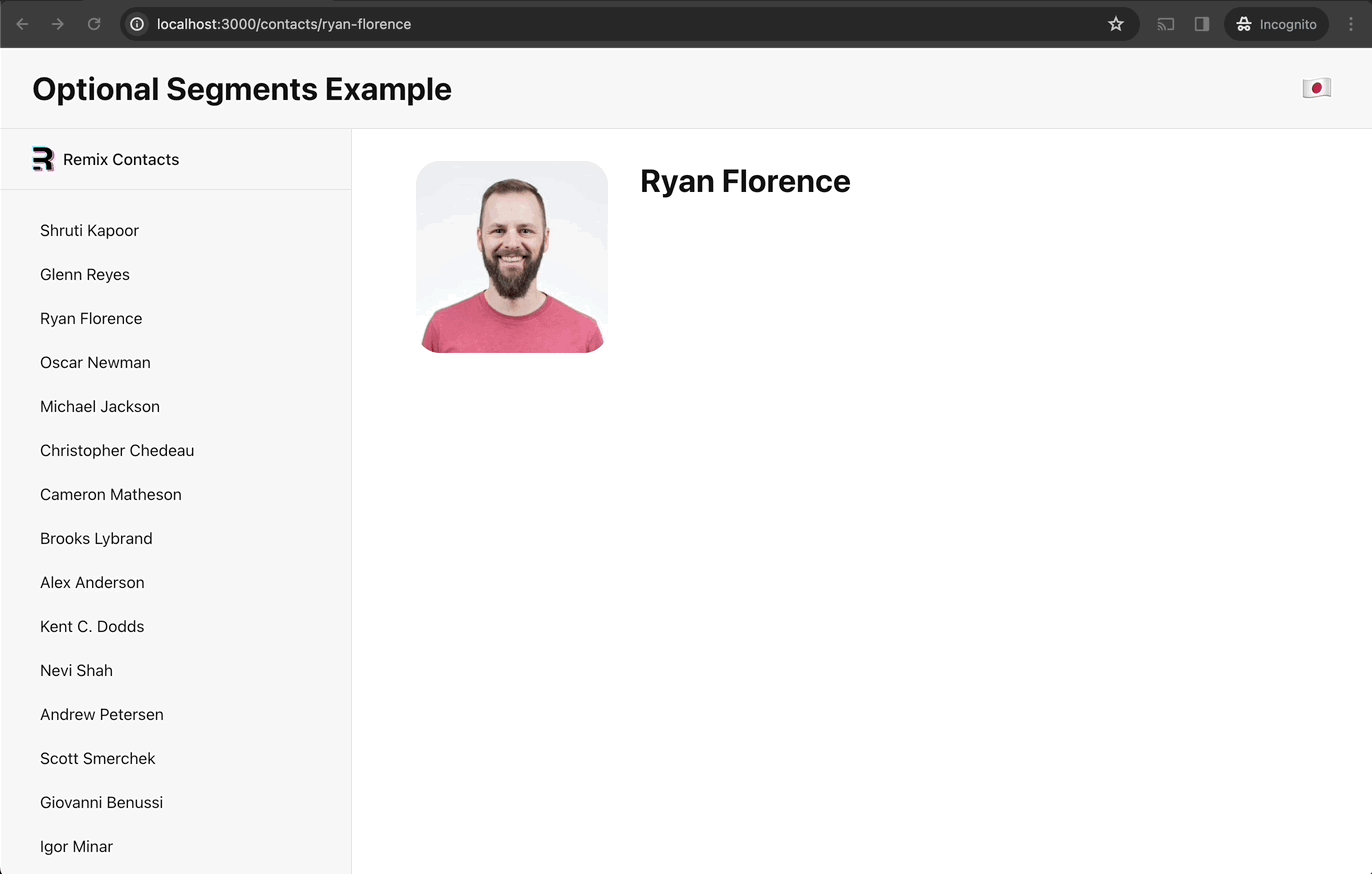
3. Optional Segments
Remix provides a built-in feature called Optional Segments. Optional Segments solve all the potential problems with i18n we saw above and is a good approach if you are unable to adopt a CMS. Remix's built-in features provide enjoyable DX that allow you to:
- Catch all slugs in nested urls and layouts
- Pull out an optional
langparameter by simply adding($lang)to in your routes
Also, it's possible to detect if params.lang is not a valid language value by creating a reusable helper function. It's a great way to provide the best UX for users.
Let's look more in-depth at what I mentioned with some example code. You can fork and clone this Optional Segments example app repo to test it out on your local machine.
This example app is partially based on the Remix contact app tutorial. It has a contacts route and contacts route has a contactId parameter.
app/
├── components/
│   └── Header.tsx // language switcher
├── routes/
│   ├── _index.tsx
│   ├── ($lang).contacts.$contactId.tsx
│   └── ($lang).contacts.tsx
├── root.tsx
├── data.tsx // contacts data
└── utils.ts // reusable getLang function to check valid params.lang
The urls /ja/contacts/ryan-florence and /contacts/ryan-florence will both match the app/routes/($lang).contacts.$contactId route, since ($lang) is optional. In this example if there is no lang param provided, we default to English (en).
A $lang parameter will match all slugs in different nested levels, such as ja/contacts and ja/contacts/ryan-florance in this example app. It covers the case where you want to implement localized sub-directories without a CMS.
Built-in parameters like params.lang saves you time when implementing i18n-supported routes. To enable Optional Segments, you can add ($lang) in the routes like this, app/routes/($lang).contacts.$contactId to catch lang parameter in the route.
Configuring localized sub-directories with functionally working routes is the most important yet time-consuming part of the i18n implementation process depending on the built-in features from frameworks. Remix removes the pain by providing helpful parameters, a flexible structure, and the best DX for developers.
Make sure you follow the Google SEO guideline for non-ASCII characters in the URL. It's not recommended to use non-ASCII characters in the URL (i.e.,
ja/contacts/マイケル-ジャクソン). It's better to use ASCII characters in the URL (i.e.,ja/contacts/michael-jackson).
The Optional Segments example app repo also includes a reusable function to check if params.lang is not a valid language code. For better UX, detecting when users access the URL with an invalid language code is essential. It is also important to show them that the page with an invalid language slug doesn't exist.
// utils.ts
import { Params } from "@remix-run/react";

export function getLang(params: Params<string>) {
  const lang = params.lang ?? "en";
  if (lang !== "ja" && lang !== "en") {
    throw new Response(null, {
      status: 404,
      statusText: `Not Found: Invalid language ${lang}`,
    });
  }
  return lang;
}
For invalid params.lang, it throws a 404 status with a message "Not Found: Invalid language ${lang}". How to throw 404 response is explained in the Remix docs.
The getLang function returns the selected valid params.lang value, which means it can be used to get only the necessary data for the selected language. The contact data object with types in data.tsx looks like this:
// data.tsx
type ContactMutation = {
  id?: string;
  avatar?: string;
  twitter?: string;
  notes?: string;
  favorite?: boolean;
  details?: {
    en?: {
      first?: string;
      last?: string;
    },
    ja?: {
      first?: string;
      last?: string;
    }
  }
};
We can slim down the data with the getLang function to return only the correct translation of the content
// ($lang).contacts.$contactId.tsx
// ...
import { getLang } from "~/utils";

export const loader = async ({ params }: LoaderFunctionArgs) => {
  invariant(params.contactId, "Missing contactId param");
  const lang = getLang(params);
  const singleContact = await getContact(params.contactId);

  if (!singleContact) {
    throw new Response("Not Found", { status: 404 });
  }

  const { avatar, twitter, notes, details } = singleContact;
  // 1. getLang func checks if params.lang is "en" or "ja"
  // 2. get either ja.first & ja.last or en.first & en.last
  const name = `${details?.[lang]?.first} ${details?.[lang]?.last}`;
  // return only necessary data for the selected language
  return json({ avatar, twitter, notes, name });
};

export default function Contact() {
  const { avatar, twitter, notes, name } = useLoaderData<typeof loader>();
  return (
    <div id="contact">
      <div>
        <img alt={`${name} avatar`} key={avatar} src={avatar} />
      </div>

      <div>
        <h1>{name}</h1>

        {twitter ? (
          <p>
            <a href={`https://twitter.com/${twitter}`}>{twitter}</a>
          </p>
        ) : null}

        {notes ? <p>{notes}</p> : null}
      </div>
    </div>
  );
}
This way, instead of getting all data with all languages for a single contact, we can get only the data required for the selected language.
// 😩 NOT what we want
{
  "avatar":
    "https://sessionize.com/image/124e-400o400o2-wHVdAuNaxi8KJrgtN3ZKci.jpg",
  "twitter": "@shrutikapoor08",
  "details": {
    "en": {
      "first": "Shruti",
      "last": "Kapoor",
    },
    "ja": {
      "first": "シュルティー",
      "last": "カプアー",
    }
  },
}

// 😁 What we want
{
  "avatar": "https://sessionize.com/image/124e-400o400o2-wHVdAuNaxi8KJrgtN3ZKci.jpg",
  "twitter": "@shrutikapoor08",
  "name": "シュルティー カプアー"
}
Getting a contacs list for the sidebar works very similarly to what we saw in ($lang).contacts.$contactId.tsx to get a single contact. Only the properties we want to get are different.
// ($lang).contacts.tsx
// ...
import Header from "~/components/Header";
import { getLang } from "~/utils";

export const loader = async ({ params }: LoaderFunctionArgs) => {
  const fullContact = await getContacts();
  const lang = getLang(params);

  const contacts = fullContact.map((contact) => ({
    // different properties to get compared to a single contact
    id: contact.id,
    name: `${contact.details?.[lang]?.first} ${contact.details?.[lang]?.last}`,
  }));

  return json({ contacts, lang });
};

export default function ContactsLayout() {
  const { contacts, lang } = useLoaderData<typeof loader>();

  return (
    <>
      <Header />
      <div id="wrapper">
        <div id="sidebar">
          <h1>{lang === "ja" ? `Remix コンタクト` : `Remix Contacts`}</h1>
          <nav>
            {contacts.length ? (
              <ul>
                {contacts.map(({ id, name }) => {
                  return (
                    <li key={id}>
                      <Link to={`${id}`}>{name}</Link>
                    </li>
                  );
                })}
              </ul>
            ) : (
              <p>
                <i>No contacts</i>
              </p>
            )}
          </nav>
        </div>
        {/* ... */}
      </div>
    </>
  );
}
To create a language switcher on the header, we can use getLang helper function on the Header component with the useLocation and useParams hooks from Remix.
useLocation can be used to get the current pathname (object) and replace the pathname with the selected language.
useParams returns an object key and value pairs of the dynamic params from the current location that are matched by the routes. (e.g., routes/($lang).contacts.$contactId.tsx matched by ja/contacts/glenn-reyes will return params.contactId with a value of glenn-reyes).
// components/Header.tsx
import { Link, useLocation, useParams } from "@remix-run/react";
import { getLang } from "~/utils";

export default function Header() {
  const { pathname } = useLocation();
  const params = useParams();
  const lang = getLang(params);

  return (
    <div id="header">
      <h1>
        {lang === "ja" ? `Optional Segments デモ` : `Optional Segments Example`}
      </h1>
      <nav>
        {lang === "ja" ? (
          <Link to={pathname.replace(/^\/ja/, "")}>🇺🇸</Link>
        ) : (
          <Link to={`/ja${pathname}`}>🇯🇵</Link>
        )}
      </nav>
    </div>
  );
}
In this way, we can create a language switcher on the header to switch the language and replace the pathname with the selected language.
More examples and sources
If you're looking for a different example and sources to see how i18n with Remix works, I recommend you check out the example from Dilum Sanjaya's interactive Remix routing example. Dilum built an example app to visualize Remix routing, and his example includes an Optional Segments example from the Remix docs.
I hope this article helped you understand how i18n works and how to manage i18n more efficiently with Remix. If you have any questions or feedback, feel free to reach out to me on Twitter!